
时间:2022-04-19 编辑:
Hilla是基于 Vaadin Fusion,结合了响应式 JavaScript 前端和 Spring Java 后端,用于全栈 Web 开发的框架。
Hilla是基于 Vaadin Fusion,结合了响应式 JavaScript 前端和 Spring Java 后端,用于全栈 Web 开发的框架。
Hilla将基于 Spring 的 Java 后端与使用 Lit 构建的 TypeScript 前端相结合,此处提到的Lit是一种快速、响应式的 JavaScript 框架。基于 Vaadin Fusion 的 Hilla 是 Java 生态系统中的一种独特框架:类似于 JavaScript 的 Next.js,不同点是Hillary是基于 Spring 的 Java 后端。本文将帮助你开始使用 Hilla,包括如何构建基本的Web 应用程序、构建前端和添加新组件。
在今年 1 月,Vaadin 的开发人员宣布将 Vaadin Fusion 重命名为 Hilla。对于已经熟悉 Fusion 的开发人员来说,只是名称发生了变化。对于刚刚学习 Hilla 的开发人员,会注意到本文中的示例中使用的包和组件都是以 Vaadin 命名的。但是在以后的版本中Vaadin Fusion 软件包都将会以 Hilla 重命名。
Hilla 将响应式 JavaScript 前端和 Spring Java 后端整合到一个统一的构建中。本文中的示例将会说明这些组件是如何协同工作的,以此来介绍Hilla全栈框架。在开始调试前,你需要在系统上安装 Node.js (npm) 和最新的 JDK。确保 node -v 和 java –version 都可以工作!
首先,打开命令行并通过 npx 搭建一个新项目,如清单 1 所示。
npx @vaadin/cli init --hilla foundry-hilla1.
现在, cd进入新目录,然后键入./mvnw(或mvnw 对于 Windows)。此命令启动 Maven 的构建。你将看到正在构建的后端和前端的输出日志记录。很快,该应用程序将启动并在开发模式下运行。

图 1. 访问 localhost:8080,你应该会看到你的 Hilla 应用程序启动并运行
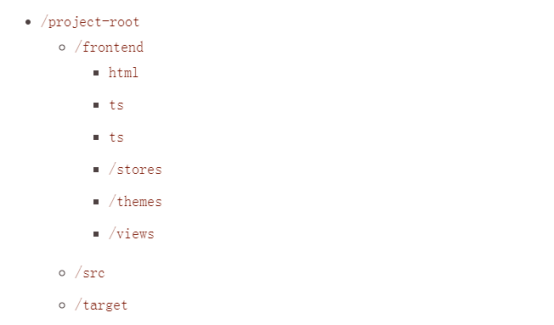
如果你看一下你刚刚构建的文件系统,你会看到结构分为标准的 Maven 结构和前端目录:

项目根目录包含 Maven 构建文件 (pom.xml),它将 Java 代码从 /src 构建到 /target,并调用 JavaScript 构建工具 (vite.js) 来构建包含在 /frontend 中的前端应用程序。
在 Hilla 中,前端是从/front-end/index.html、/front-end/index.ts和routes.ts文件中引导的。这些文件一起确定路由并将内容设置到给定路由的页面。这些页面中最具启发性的是routes.ts,如清单 2 所示。
import { Route } from '@vaadin/router';import './views/helloworld/hello-world-view';import './views/main-layout';export type ViewRoute = Route & { title?: string; icon?: string; children?: ViewRoute[];
};export const views: ViewRoute[] = [ // place routes below (more info https://vaadin.com/docs/latest/fusion/routing/overview)
 {   path: '',   component: 'hello-world-view',   icon: '',   title: '',
 },
 {   path: 'hello',   component: 'hello-world-view',   icon: 'la la-globe',   title: 'Hello World',
 },
 {   path: 'about',   component: 'about-view',   icon: 'la la-file',   title: 'About',   action: async (_context, _command) => {     await import('./views/about/about-view');     return;
   },
 },
];export const routes: ViewRoute[] = [
 {   path: '',   component: 'main-layout',   children: [...views],
 },
];
清单 2 中的代码将路径与组件相关联。与许多 JavaScript 框架一样,Hilla 使用组件来表示视图。在这种情况下,当用户转到空白路线时,它将提供hello-world-view组件。(请注意,其他路线提供额外的信息,如图标、标题和操作。)
主布局由 /frontend/views/main-layout.ts 处理,而 hello-world-view 的内容在 /frontend/views/helloworld/hello-world-view.ts 中,如清单 3 所示。
import '@vaadin/button';import '@vaadin/notification';import { Notification } from '@vaadin/notification';import '@vaadin/text-field';import { html } from 'lit';import { customElement } from 'lit/decorators.js';import { View } from '../../views/view';@customElement('hello-world-view')export class HelloWorldView extends View { name = ''; connectedCallback() {   super.connectedCallback();   this.classList.add('flex', 'p-m', 'gap-m', 'items-end');
 } render() {   return html`     <vaadin-text-field label="Your name" @value-changed=${this.nameChanged}></vaadin-text-field>     <vaadin-button @click=${this.sayHello}>Say hello</vaadin-button>   `;
 } nameChanged(e: CustomEvent) {   this.name = e.detail.value;
 } sayHello() {   Notification.show(`Hello ${this.name}`);
 }
}
清单 3 中的代码显示了 Lit 构建视图。如果你熟悉响应式 JavaScript 习惯用法,那么来源应该很清楚。如果没有,请参阅我最近对 Lit 的介绍。该render()方法负责输出视图的内容。我们将在这里用它搜索某个事物。特别是,我们想看看如何将这个前端与我们的后端 Java 端点连接起来。
Hilla 构建在 Spring Boot 之上,因此我们可以像往常一样使用 Spring Web构建端点。Hilla 提供了额外的功能来自动生成将在 Lit 前端使用的 TypeScript。
/src/java/main/com/example/application首先在被调用的文件中创建一个新文件MyEndpoint.java。将清单 4 的内容粘贴到该文件中。
package com.example.application;import com.vaadin.flow.server.auth.AnonymousAllowed;import dev.hilla.Endpoint;import dev.hilla.Nonnull;@Endpoint@AnonymousAllowedPublic @Nonnull class MyEndpoint {   public String foo() {       return "bar";
   }
}
Hilla 的 @Endpoint注释告诉框架这个类是一个 REST API。该类也使用注解进行@AnonymousAllowed注解,因为默认情况下,Hilla 通过 Spring 安全性保护所有端点。@Nonnull注释为前端 TypeScript 生成正确的类型绑定。
保存这个类文件后,你可以观察到 Hilla 已经在 /frontend/generated/MyEndpoint.ts 中生成了一个新的 TypeScript 文件。我们将使用这个模块从视图中点击端点。
注意:不要对这些生成的文件进行更改;Hilla 将根据对 Java 文件的更改覆盖它们。
现在,返回到 frontend/views/helloworld/hello-world-view.ts,我们将在这里使用我们的简单端点。在这种情况下,我们想要输出需要调用 foo() 端点(即“bar”)的内容。清单 5 显示了你应该对 hello-world-view.ts 文件进行的添加。 (请注意,我已经删除了大部分以前的代码,只留下了这个清单的附加内容。)
//...import { customElement,property } from 'lit/decorators.js';import { foo } from 'Frontend/generated/MyEndpoint';@customElement('hello-world-view')export class HelloWorldView extends View {  //...  @property()  myString: string = "";  constructor() {    super();    this.getString();
  }  render() {     return html`     //...     <div>${this.myString}</div>   `;
 }  async getString() {     this.myString = await foo();
   }
}
这里的要点是从 MyEndpoint 模块中导入 foo() 函数,然后使用它来调用我们之前定义的远程后端 Java 方法。
为此,我们使用 Lit TypeScript 注释 @property 在类上定义了一个反应属性,名称为string。我们将使用此属性来存储来自服务器的值。为了填充它,我们调用 async getString() 方法,该方法简单地调用 foo() 函数,并将返回值放入 myString。
Hilla 处理了大部分工作,包括进行远程获取,因此我们不必考虑太多。
正如我之前提到的,Hilla 是 Vaadin Fusion,因此使用 Hilla 构建的应用程序可以利用你可能从该框架中了解的所有精心设计的组件。例如,让我们使用 Vaadin 网格组件来加载带有标题和作者的小说集。
首先,我们将创建一个模型对象,它只包含两个字符串,如清单 6 所示。这个文件是一个典型的 Java 数据对象。将其保存为 /src/main/java/com/example/application/Novel.java。
package com.example.application;import javax.validation.constraints.NotBlank;public class Novel {   @NotBlank   private String title;   @NotBlank   private String author;   public Novel(String title, String author){     this.title = title;     this.author = author;
   }   public String getTitle() {       return title;
   }   public void setTitle(String title) {       this.title = title;
   }   public String getAuthor() {       return author;
   }   public void setAuthor(String author) {       this.author = author;
   }
}
在清单 7 中,我们提供来自 MyEndpoint 的小说列表。
package com.example.application;import java.util.*;import java.util.ArrayList;import java.util.List;import com.vaadin.flow.server.auth.AnonymousAllowed;import dev.hilla.Endpoint;import dev.hilla.Nonnull;@Endpoint@AnonymousAllowedpublic class MyEndpoint {   private final List<Novel> novels = new ArrayList<Novel>();   MyEndpoint(){     Novel empireFalls = new Novel("Empire Falls", "Richard Russo");     Novel reservationBlues = new Novel("Reservation Blues", "Sherman Alexie");     Novel theAthenianMurders = new Novel("The Athenian Murders", "José Carlos Somoza");     this.novels.add(empireFalls);     this.novels.add(reservationBlues);     this.novels.add(theAthenianMurders);
   }   public @Nonnull List<Novel> getNovels() {     return this.novels;
   }
}
在清单 7 中,我们准备了几本带有作者的小说,并将它们插入到 novels 属性中。然后我们在 getNovels() 端点中公开数据。
现在,让我们显示新数据,如清单 8 所示。(请注意,清单 8 只显示了代码的更改部分。)
//...import { foo, getNovels } from 'Frontend/generated/MyEndpoint';import '@vaadin/grid/vaadin-grid';@customElement('hello-world-view')export class HelloWorldView extends View { @property() novels: object = {}; constructor() {   //...   this.initNovels();
 } render() {   return html`     <vaadin-grid .items="${this.novels}" theme="row-stripes">       <vaadin-grid-column path="title"></vaadin-grid-column>       <vaadin-grid-column path="author"></vaadin-grid-column>     </vaadin-grid>   `;
 }  async initNovels(){     this.novels = await getNovels();
}
在此清单中,我们从 Hilla 为我们生成的 frontend/generated/MyEndpont 导入 getNovels 对象。然后,我们使用该方法作为 this.novels 内容的来源。
接下来,我们使用 this.novels 为导入的 vaadin-grid 组件提供 .items 属性。最终结果是一个格式良好的网格组件,而且工作量很小。